Saturday, June 29, 2013

Coconut Cream Pudding Cookies with Coconut M&M's and Cherry Pie!

A little while back I got a message from my BFF requesting I make these ultra coconut-ey cookies. Oddly enough I didn't have all of the ingredients.  Who has coconut cream pudding mix and coconut M&M's in their pantry?!?  Well, I didn't --- for shame!  It took me a couple weeks to get these extraneous items, but, alas I did.

Let's just say the dough was a-ma-zing!!!!!!!! And yes, I am one of those people that eats raw cookie dough. Salmonella be damned!!  C#1 liked the dough, too, but, I decided I should make the cookies, since said BFF wanted some...

Coconut Cream Pudding Cookies with Coconut M&M's
Ingredients
1 cup butter, room temp
3/4 cup brown sugar
1/4 cup sugar
1 (4oz) package instant Coconut Cream Pudding mix (pudding comes in a weird 3.4 oz size or something, but, I only used one package.)
2 1/4 cups flour
1 tsp baking soda
2 eggs
1 tsp vanilla
1/3 cup flaked coconut
1 cup Coconut M&Ms (about 4 small pkgs) (I bought a big bag --- I didn't even see the small bags at the store.)
1 cup Milk Chocolate Chips
Instructions
Preheat oven to 350 degrees. 
Combine flour and soda in a small bowl and set aside.  Cream together butter and sugar.  Beat in pudding mix until blended, then eggs and vanilla.  Add flour and soda mixture. Stir in coconut M&M’s, flaked coconut, and chocolate chips.  Using a cookie dough scooper, place dough on a baking sheet lined with parchment paper.  Bake at 350 degrees for 8 minutes.  Let cookies cool for 5 minutes on baking sheet before moving to a cooking rack.  Store in air-tight container.  Makes two dozen.  (I made way more than two dozen.  I did however use the small cookie scoop and restrained myself from eating all of the cookie dough.)


They were very easy to make. The only difficulty was wrangling up all of the ingredients... I will definitely be making these, again!

AND I've decided parchment paper is the BEST! I knew this, but, it worked wonders with these cookies!


I also made cherry pie.  I actually made that before the cookies, since the dearest hubby requested it this morning.  The only annoying part about it was that I was using fresh cherries and had to pit 5 cups worth (the rest of what I had available.)  Let's just say I have some nasty looking fingernails, now.

I used the recipe from Diner Desserts by Tish Boyle on page 34-35.  I should state that this book has the awesomest recipe for "Coconut Dream Pie" and "Jumbo Blueberry Muffins."


I searched for the recipe online, since I am far to lazy to type it out, but, didn't find it. So you will just have to either buy or borrow the book. 

But, here is what you get.... And I didn't even do the latticing right. It looks kind of duh, but, it tastes great!!


The recipe said to eat it slightly warmed. I added the ice cream! And yes, it tastes as good as it looks!

So there you have it. My cooking adventures for the day. 
Till next time...


Monday, June 24, 2013

This week's Walmart savings.

And summer begins... And holy smokes, there is a lot going on.  But, because I am too lazy to write anything of length, I am just going to brag about my savings on the last round of savings at Walmart.  I know there are many out there that don't like Walmart, but, once you've learned "its ways" it's all good.

Here are my savings from last week --->

$22.10 price match savings
$18.00 coupon savings
= $40.10 grand total!!!

That is pretty good since it was a last minute whim to go and a very hasty look through the ads.

It wasn't more than the week before, but, it is a weekly challenge to see how much I can save... And I do find it slightly entertaining!

Till next time...


Monday, June 17, 2013

Grilled Bananas with Ice Cream and Caramel

I only have a couple of magazine subscriptions and of late I have been finding lots of very interesting recipes in the "All You" magazine.  I happened upon "Grilled Bananas with Ice Cream and Caramel."  It had a very yummy looking picture right next to it and I had to try it.

I, of course, had all of the ingredients. It was yet another week of buying bananas because they said, "Of course, I/we will eat them..." And, of course, they didn't. *sigh*  So here ya go!

Grilled Bananas with Ice Cream and Caramel "All You" July 26, 2013 page 79

1 1/2  cups sugar
1/2 cup water
1 cup heavy cream
2 tbsp unsalted butter, cut into pieces (I used salted, as I have no unsalted and it has yet to be proven to me that it really makes a difference...)
1 tsp vanilla extract
pinch of salt (I did not add salt, since I used salted butter.)
2 tbsp packed light brown sugar
1/2 tsp cinnamon
2 tbsp honey
6 firm but ripe bananas
6 scoops vanilla ice cream

1. Make caramel: Stir sugar and 1/2 cup water in a pan over medium - low heat until sugar dissolves. Raise heat to medium-high. Watching carefully; boil syrup without stirring until it is a dark amber color, 10-15 minutes. Remove from heat and carefully pour in cream (the mixture will bubble up and splatter.) Reduce heat to low; cook, stirring constantly, until mixture thickens and becomes smooth, 2-5 minutes. Remove from heat; whisk in butter, vanilla and salt.

2. In a bowl, mix brown sugar and cinnamon. Warm honey in microwave for 15 seconds.
3. Preheat grill medium-high. Cut unpeeled bananas in half lengthwise. Brush cut side with honey; sprinkle with sugar mixture. 


Oil grill (I didn't do that, but, I made sure it was clean, since we had hamburgers the night before...) Place bananas on grill, cut sides up. cook until bananas are tender and flesh pulls away from skin, 3 to 4 minutes.


4. Using 2 spoons, gently remove 2 banana halves from peels. Place 2 halves in a bowl, top with ice cream and drizzle with caramel. Repeat with remaining bananas, ice cream and caramel.


This was a hit! Everyone loved it and I had extra caramel sauce. I used the extra caramel sauce the next morning to make "German style" french toast -- but, I will blog about that another time...

Today my goal was to use up the fresh cherries I bought last week.  And as I was making the pastry for the turnovers I noticed C#1 sitting at the dining room table.  I decided that he could (and would) help me. I grabbed the bowl with the dough, a rolling pin, wax paper and flour and said , "You will help me!"  He didn't even fuss about it and did a better job at rolling out the crusts than I did (but, that too will be a blog for another day.)  Of course, he thought that if he helped he would get out of doing a specific chore. Ahhh No sirrrreee!  Especially since he dumped flour all over the carpet.  I did agree to clean up the table stuff, because, he thought it would be a great idea to make chocolate chip cookies. 


The lovely table covered in flour... The tape measure was for the turnover pastry. Just so we got an idea how big they should be...

I told him that he could make the cookies, since, he wanted them so badly and he did! Of course, I wasn't off the hook.  I was the one watching the cookies and burning off my hand/fingers removing the pans from the oven. But, it was a good time and C#1 can claim that he made the cookies.


So there you have it.  My day in a nutshell.
Till next time...


Thursday, June 13, 2013

Strawberry Cheesecake Parfaits and a HUGE savings at Walmart!!!

I was perusing through a magazine and saw a recipe for parfaits. I didn't have some of the ingredients and decided to make my own.  It turned out to be a hit and I've made it twice in the last three days.

Strawberry Cheesecake Parfait
Serves 4

1 1/2 cup fresh sliced strawberries (I also added some frozen fruit - strawberries, mangoes & blueberries)
6 TB sugar, divided
8 oz cream cheese, softened
1/2 cup sour cream
1 tsp vanilla
3 graham crackers, crushed

1. Combine strawberries and 2 TB sugar in a bowl. Mash the strawberries with a potato masher, to create juice -- leaving some chunks. Stir and let stand while you prepare the cheesecake.

2. Combine the cream cheese, sour cream, 4 TB sugar and vanilla in a mixing bowl. Beat with an electric mixer, until light and fluffy.

3. Spoon 2 TB of the strawberry mixture into each of the 4 parfait/sundae cups. Top with a heaping tablespoonful of cream cheese mix. Top with crushed graham cracker crumbs. Repeat these layers, ending with the graham cracker crumbs.  Serve immediately or refrigerate.


This recipe is really easy and you don't have to use fresh ingredients -- frozen works pretty well, too! The first time I made it I had to supplement the fresh strawberries. The second time I made it I used only fresh strawberries (I had just gone to the store.)

Speaking of going to the store, I must share how much I saved with price-match at Walmart.  Are you ready for it?!?!?!?!?!?  Approximately $45.90!!!!! Whoohoo!!! I had C#1 and C#2 with me. Let me just say they were not impressed with the excursion, but, I figured they should have to suffer, too. I had to sit at the orthodontist for 1+ hours waiting for their faces to be properly adjusted.  Of course, I tortured them with Sam's club, too, where I stalked S#4.  S#4 was busy working, but, I got lucky and the manager, who was instructing her, opened up a check-out lane. I got out of there before a LOT of people who were waiting in line. I felt a little bit bad, but, only a little.  C#1 and C#2 were pleased with the express check out.

Anyway --- That's it for today.
Till next time.......

Friday, June 7, 2013

Baked Eggs!!!

Yes, you read that right. Baked eggs.  I was perusing the Internet and came upon a recipe for this lovely creation.  I decided to tweak it and make my own similar creation.  The great thing about baked eggs is that you can make a whole bunch of them and easily microwave them in the morning to make breakfast sandwiches.  I guinea pigged these sandwiches on C#1 and C#2 and they loved them!  I had two right after I baked them sans muffin. They tasted like a mix of fried and hard boiled.  I find you usually can't add salt to an already fried egg, but, you can with a hard boiled.  You can definitely add salt to the baked eggs, which makes them great in my book.

All you need is a cupcake pan, cooking spray, eggs, salt and pepper, and butter. Preheat the oven to 350 degrees.

1. Spray all of the cups in the cupcake pan. Then crack an egg into each.


2. Sprinkle each egg with salt and pepper. Then put a dab of butter on each or however much you manage to glop onto each egg and only if you want to.


3. Place in oven for 10-15 minutes -- depending on your desired doneness. 15 minutes makes them all hard. If you cook them for a little bit less the yolk is soft-ish.


4.  Pop them out and enjoy! They seriously just pop out. Get a knife or whatever and they come out easy peasy!

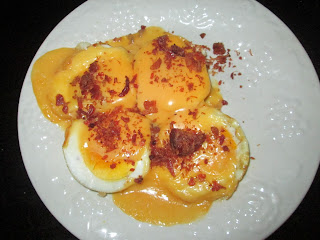
To make the breakfast sandwiches I cut the eggs in half and put a piece of Velveeta cheese on each half (of course you can use whatever cheese you want or no cheese at all.) Then I sprinkled each half with crumbled bacon and microwaved it for about 1 minute.  While the egg was nuking I toasted an English muffin.  Once everything is cooked to their desired doneness place the egg/cheese on the muffin and chow down!  


The eggs are "thick" so it is easy to slice them in half.


Here they are after being nuked for about a minute in all their cheesy goodness!


Not sure why I took a picture without the cheese melted on it, but, I'm sure you get the gist of it.

After making 12 eggs and once everyone was done with their sandwiches, I put the rest in a flat container (with a lid) for storage in the refrigerator.


This IS the container I used. It fit 2x4 eggs perfectly!

So there you have it baked eggs. I know it sounds weird, but, it tastes and works great!

Till next time...